Determining if the report has sufficient quality of data to enable setting causality and terminology by the PV team
Step 1: Identifying new adverse event reports that have been submitted by a facility
Reports that have been submitted within a specified timeframe will be designated as new and appear in the New Report tab. Reports will remain in this tab for a period of 2 days, irrespective if any updates have been applied to the report.
Benefits of the New Reports tabThis tab is useful to easily identify reports that have recently been submitted. It can be used to ensure there is sufficient resource to respond to each report and to initiate the process of event management between the PV team and the facility clinician who reported the event. New Reports time frame It is possible to confirm the period of what constitutes a new report in the administration section of PViMS. The default setting is 2 days from date of report submission.
Step 2: View clinical details associated to the report
Once you have identified that a new report has been created in PViMS, the process of confirming if the report is of sufficient quality to allow the setting of causality and terminology can begin. Clinical details associated to the adverse event can be viewed using the View Details or Patient Summary menu options that appear alongside the corresponding report.
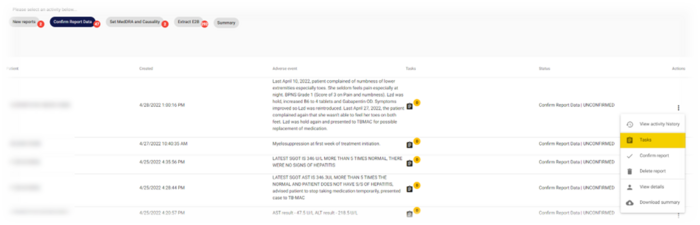
Locate the report you would like to view in the Confirm Report Data table
Mouse over the menu item at the end of the report and select this icon
Navigate to the corresponding menu and select that item
The system will either display details associated to the report within PViMS or download a patient summary MS Word Document
Benefits of the Patient Summary.Producing a patient summary provides you with a physical file that can be emailed separately from within the system. This may allow you to share details of the report without designated recipients needing access to PViMS.
Step 3: Generating tasks per issue of data quality
Data inconsistencies or lack of sufficient data invariably has a multi-faceted impact on the time taken to determine causality, the strength and accuracy of the causality determined and will ultimately negatively affect the ability of the national PV team to assist the clinician in the management of the event. The primary function of the Confirm Report Data stage is to expedite the process of assuring data quality and to ensure there is ongoing training and communication with the facility to improve clinical record keeping.
A key tool in the confirmation process is the ability to create data quality tasks for the associated report. To add a task,
Locate the report you would like to add a Task for in the Confirm Report Data table
Mouse over the menu item at the end of the report and select this iconCreating a Task
Navigate to the corresponding menu and select that item
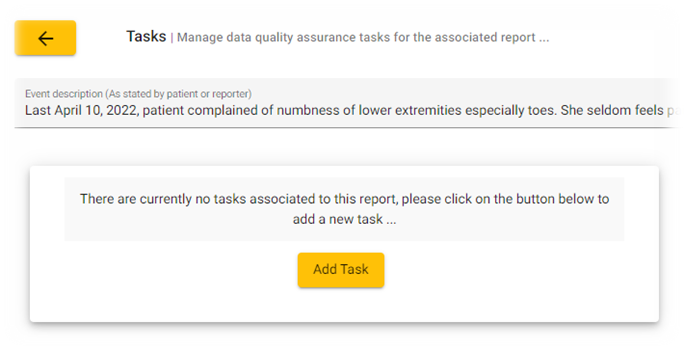
The system will navigate you to a form that lists existing tasks that have been allocated to the report (Please note that if this is the first task for the report you will be notified of this)Create Task 2
Select the Add Task button to add a new task.
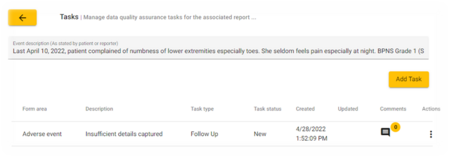
Enter details of the task noting that the form area is a generic area of the report where the data quality issue lies, and the type of task can be used to indicate if there is a data quality issue or a general follow up on the report required. Enter details of the issue or follow up in the details tab.
Select the Save button to save the task for the adverse event report.Save the Task.
Using tasks to initiate follow up with the clinician
Generating a task will result in two notifications been sent. The first notification takes the form of an email that is sent to the reporting clinician containing details of the report and the task that has been created. The second notification takes the form of an internal PViMS notification that is sent to the system user that registered the report, this includes a system notification to EDRWeb.
Step 4: Tracking tasks using its status and adding comments to the task
The key to expediting the data quality assurance process is to improve the process of fixing data quality issues through improved communication between the facility clinician and the PV technician. The ability to track task the task becomes critical in this regard.
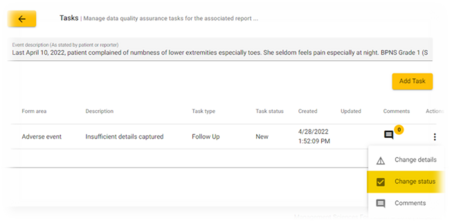
To change the status of a task:
Locate the report you would like to ass a Task for in the Confirm Report Data table.
Mouse over the menu item at the end of the report and select this icon.
Navigate to the corresponding menu and select that item.Tracking a Task
Tracking TasksThe system will navigate you to a form that lists existing tasks that have been allocated to the report.
Changing Task StatusMouse over the menu item at the end of the task and select this icon.
Navigate to the corresponding menu and select that item.
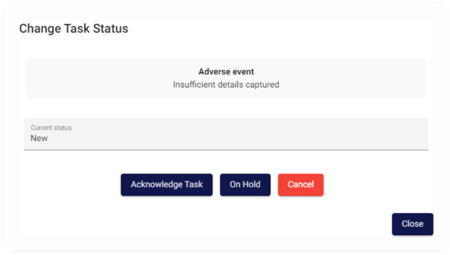
Confirm Task ChangeThe system will pop up a form where the status of a task can be changed.
The following task statuses apply:
Acknowledge Task
The clinician can acknowledge that they have received the task
On Hold
The Task has not been cancelled but can be put on hold
Cancel
The task is cancelled and no follow up is required
Completed
The task has been completed and addressed
Using tasks to track efficiency of data quality processes
A task forms a fundamentally useful mechanism for determining efficacy of data quality processes centrally and at facility level. Useful metrics such as the number of tasks per report per facility allow us to determine if a facility needs additional intervention in the form of training or resources. Other metrics such as time taken to complete a task may also indicate a new for improved communication and resourcing.
Comments can be used to facilitate ongoing communication between the PV technician and the reporting clinician. To add a comment to a report:
Locate the report you would like to add a Task for in the Confirm Report Data table.
Mouse over the menu item at the end of the report and select this icon.Open the Task screen
Navigate to the corresponding menu and select that item.
The system will navigate you to a form that lists existing tasks that have been allocated to the report.
Mouse over the menu item at the end of the task and select this icon.
Navigate to the corresponding menu and select that item.
The system will pop up a form where comments can be added to the report.
Using comments effectively to communicate between the PV team and the clinician
Comments are useful in that they facilitate communication between the PV team and the clinician. While comments should be used judiciously, they indicate there is activity on the task and forms an effective audit trail for activity on the task for all to see.
Step 5: Confirming report is of sufficient quality to proceed
A report may only move into the causality and terminology phase by confirming the report is of sufficient quality to proceed. It is very important to note that once a report is confirmed, it is expected that the report is of sufficient quality to proceed.
Confirmation that a report has successfully passed the Confirm Data stage can be achieved by,
Locate the report you would like to ass a Task for in the Confirm Report Data table
Mouse over the menu item at the end of the report and select this icon
Navigate to the corresponding menu and select Confirm Report
The system will pop up a form asking the user to confirm if the report is ready for confirmation
Enter any comments if necessary and select the Save button to confirm the report
Confirm data for a report
Confirming the report will effectively move the report into the Causality and Terminology tab
Deleting a report
A report should only be deleted if it is determined to be a duplicate or was incorrectly captured in the clinical system
Outcome B: Setting Causality and Terminology for a Report
Setting causality using either the MedDRA or Naranjo scale and determining the MedDRA term for the adverse event
Step 1: Identifying adverse event reports that are set for causality and terminology
Reports that have been confirmed will now appear in the Set MedDRA and Causality tab. Reports will remain in this tab until causality and terminology has been completed.
Step 2: Setting the MedDRA term for a reportMedDRA is the Medical Dictionary for Regulatory Activities and is a clinically validated international medical terminology dictionary-thesaurus used by regulatory authorities and the biopharmaceutical industry during the regulatory process.
Once a report is moved into the Set MedDRA and Causality phase, the first step is to set the MedDRA term for the report. To set the term,
Locate the report you would like to SetTerminology for in the Set MedDRA and Causality table
Mouse over the menu item at the end of the report and select this icon
Navigate to the corresponding menu and select Set Terminology
The system will pop up a form where the MedDRA term can be set for the report
It is possible to search for a MedDRA term using 3 different methods.
Method 1 allows for searching for the at the corresponding level you select. For instance, you can search all Low-Level Terms which include the term you are searching for. This is the most efficient method for searching for a term.
Method 2 allows for searching for the term by its associated code. This method is primarily useful if you know the code you are searching for.
Method 3 allows for searching for the term using the hierarchical structure of MedDRA. This is the most precise way of searching through MedDRA but is also the most time consuming.
Once you have located the term you have searched for, select the send icon next to the corresponding term. This will set the term for the report.
Benefits of allocating a MedDRA term to a report
By allocating a MedDRA term to the report, this endeavors to facilitate the exchange of clinical information through a single standardized international medical terminology that can be used for regulatory communication and evaluation of data pertaining to medicinal products for human use.
Step 3: Setting causality per medication
Causality assessment essentially means finding a causal association or relationship between a drug and a drug reaction. It is an evaluation of the likelihood that a particular treatment is the cause of an observed adverse event.
Once a report is moved into the Set MedDRA and Causality phase, after the MedDRA term for the report is set, the second step is to set causality per medication the patient has been exposed to. To set causality using the Naranjo scale,
Locate the report you would like to SetCausality for in the Set MedDRA and Causality table
Mouse over the menu item at the end of the report and select this icon
Navigate to the corresponding menu and select Naranjo Causality
The system will pop up a form where causality can be set per medication
To set causality for a specific medication, select the blue send icon for the corresponding medication, after which you will be navigated to a form where you can set causality for the medication using the Naranjo scale
Answer each question in turn and once all questions are answered, the user will be presented with the associated causality based on the answers provided
Select the Save button to save causality for the medication
You can view causality set per medication using the View Button
Benefits of setting causality per medication
Once causality has been set, PViMS is able to detect signals based on patient exposure rates per medication.